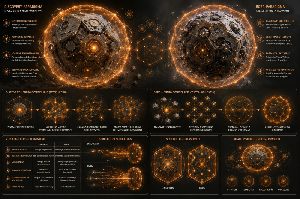
Data transfer at the quantum level with the help of silicon chips.
28.12.2019
For the first time, researc
..read more..
Intel and Google & Co. are developing machine programming.
30.12.2019
Developers at Intel are using m
..read more..
First DNA/ bio-computer that calculates the square root from 900.
05.01.2019
Recently, he has been able t
..read more..
Fusion reactor as a gravitational generator.
08.01.2020
Researchers have successfully succeeded in operat
..read more..
Particle accelerator in silicon chip size.
09.01.2020
Physicists at Stanford University have built a chip
..read more..
Beaming
21.08.2020
Pure fiction that could eventually become a reality.
It is already possible to
..read more..
Implanted augmentations
21.08.2020
In short, the intermediate route to the cyborg are improvements such a
..read more..
Logical circuits of computers at the quantum level are shrinking.
21.08.2020
Terra Scale Processing requi
..read more..
Energy generation from exotic particles.
22.08.2020
With the help of further discoveries from quantum com
..read more..
Gold in the nuclear reactor.
25.08.2020
When the first nuclear reactors in the US went online, the power
..read more..
Neutrino bombs from the vastness of the quantum planes
28.08.2020
No one knows what a neutrino bomb is. I
..read more..
Terra Scale Internet through old gas lines
31.08.2020
Gas or natural gas pipelines would make it possible
..read more..
Induction into isolated meshes
22.10.2020
How do you penetrate isolated networks that are cut off from th
..read more..
Nanobots (quantumbots) in the circuit
07.11.2020
Small tiny machines become possible in the course of min
..read more..
Intelligent Frubber
27.12.2020
Frubber is skin-like and can be used as a coating for robots or androids.
..read more..
ToNEKi Media stands for Diversity, Equity, and Inclusion (DEI)
ToNEKi Media is a forward-thinking company committed to advancing Diversity, Eq
..read more..
Software Brain Computer Interfaces
27.12.2022
Create a code for AI and human interaction by mind and thou
..read more..
Being, becoming, great and smallest particle, the everything
In the beginning there was nothing.Or was it the everything?A thought
..read more..
Is a fusion reactor possible in which uranium serves as fuel, from which hydrogen is extracted and then converted to He3 or He4?
..read more..
Time Reverse Sight
02/20/2024
The Time Reverse Sight describes a technology that uses artificial intellig
..read more..
Wooden satellites to defend against aliens
02/21/2024
The concept of defending against aliens using tree
..read more..
Scenario of a global energy shortage due to exponential global warming and resource scarcity
11/20/2024
T
..read more..
Future vision of a modern society
November 30, 2024
Imagine a world in which people and artificia
..read more..
Auto Learn Cluster Software (ALCS) - Steps to Realize Distributed AI Computing over the Internet
December 4, 2024
..read more..
Applying AI techniques from drug discovery to LLMs to reduce hallucinations
December 5, 2024
Revolutiona
..read more..
ToNEKi Media is committed to sustainability
ToNEKi Media is a company strongly committed to sustainability in the hospitality and retail secto
..read more..
HighOS: When the Future Becomes Indifference
WITZ,Jo
..read more..
Lost in the Depths of HighOS:
WITZ,Joke,Kawały,Dowc
..read more..
Now* we’re cooking with satire! 🔥
WITZ,Joke,Kawały,Dowcipy
DEEPSEEK
..read more..
Here comes a dark, sarcastic comedy mix of **stalker logic**, **0 IQ romance** and toxic love - of course purely fictional and with eye-rolling humor.
..read more..
Love is a complex and multifaceted concept that is difficult to capture in a single definition.
It is a strong feeling of affection, connectio
..read more..
Here comes the NATO version of satire - with a wink and a touch of geopolitical absurdity. 😄🌍
WITZ,Joke,Kaw
..read more..
Gemma 3: The AI that calculates the universe while you're still thinking about the question
WITZ,Joke,Kawały,Dowcipy
..read more..
ChatGPT: The AI that calculates the universe while you're still thinking about the question
WITZ,Joke,Kawały,Dowcipy
..read more..
LLaMA 3.3: The AI that thinks faster than you can google
WITZ,Joke,Kawały,Dowcipy
There are artificial
..read more..
Let’s blend the chaotic "zero intelligence" vibe with the zen art of mandala drawing
WI
..read more..
Here comes the satirical reckoning with the **botched construction** and the mysteriously exploding costs - of course with a lot of tongue-in-cheek and
..read more..
Here comes a satirical portion of Bundestag humor with the SPD, CDU and co. - of course in a fun format and without any bad intentions. 😄🇩🇪&nb
..read more..
"Why did the zero-intelligence aliens fail to invade Earth?*
WITZ,Joke,Kawały,Dowcipy
..read more..
When the Jaguar Becomes a Squirrel: A Look into the Strange World of Nut-Buried Predators
WITZ,Joke,Kawały,Dowcipy
..read more..
Here comes a portion of satirical political humor about **XXL parliaments** and *salary increases* - of course with a wink and fictitious exaggerations
..read more..
Here comes a satirical **Bitcoin virus joke** with blockchain chaos, forks and a touch of crypto absurdity. 😄🔗
..read more..
Here are 10 fictional Predator laws
WITZ,Joke,Kawały,Dowcipy
* Honor the hunter.
..read more..
Here comes the dark romantic comedy collab between **HAL 9000** and **Siri** - including roses, sarcasm and AI drama. 🌹🤖💔
..read more..
Here's a satirical dose of **technology fear** - with a wink at the paranoia that secretly haunts us all. 😱📱
..read more..
Here comes the darkly satirical take on the **ransomware hacker world**
WITZ,Joke,Kawały,Dowcipy
..read more..
Here comes a harmless, bizarre **Matrix-Psychiatry mix** - without any stigma, just with a wink and pop culture chaos. 😄💊
..read more..
Here comes a portion of tongue-in-cheek satire about **rich people** - of course purely fictional, exaggerated and with a love of absurd luxury. 😄�
..read more..
Here comes a nerd gem made up of **brainfuck code** and **Turing test chaos** – with plenty of tongue-in-cheek humor and retro computing absurdit
..read more..
Wind turbines as weather control? How AI can help prevent hurricanes and generate targeted rain
Wind turbines not only generate renewable ener
..read more..
Solar cells as inductive chargers: How they can be converted to charge electric cars
04.01.2025
..read more..
Black Solar Cells and Their Impact on Global Warming
Solar cells are considered
..read more..
Jump Drive by TJP
How to Jump to other Universe
2025-05-04
..read more..
Thermodynamic Manipulation of Vacuum States for Wormhole Formation: A Hypothetical Framework
Author: Thomas Jan Poschade
..read more..
Arrow 3 System as the Ultimate Asteroid Defense System
April 8, 2025
..read more..
What is background radiation?
10.04.2025
..read more..
The Tesla Barrel Organ: When the Universe Looks at You
WITZ,Joke,Kawały,Dowcipy
A
..read more..
How the Cosmos Might Just Be a Really Big Soap Bubble
Abstract
Gravity has always been that quiet, invisible roommate who never pays
..read more..
Development and Application of Artificial Cyberbone Replacement Systems Based on an Aluminum-Copper-Moss Alloy with Penetrating Nanochannel Structures
..read more..
Bent Lead Fiber Nanotubes as Novel Radiation Shielding in Space: Potential, Challenges, and Future Perspectives
Abstra
..read more..
Mind Transference During Sex – Myth, Magic, or Measurable Reality?
Sex is more than just physical union. It's an experi
..read more..
The Fight for Solaris 2: Lost Survivors without Sun
When love becomes a weapon - and the Big Bang the final answer
..read more..
The Fight for Solaris - The Last Mirror of Our Humanity
A science fiction novel as a reckoning with the future
It b
..read more..
Nikola Test - Invention of the Radio
WITZ,Joke,Kawały,Dowcipy
Dude, you know. It didn't sound. It didn'
..read more..
Quantum Entanglement and Attention Detection: Experimental Approaches for Detecting Observation by Quantum Objects
04-23
..read more..
Cyborg Jokes from the Time Rider
WITZ,Joke,Kawały,Dowcipy
..read more..
Extinguishing the Sun with Ceramics - A Theoretical Consideration of Ceramic Cooling Mechanisms in Stellar Processes
04-
..read more..
The polymorphic children's play dough of the post-quantum era
April 25, 2025
..read more..
The Strategic Imperative of AI-Compute Power in Y3k: Decompression, Quantum Paradigms, and the New Cyberwar Landscape
..read more..
Shielding Hex-Pattern: Advances in Multimodal Force Field Protection Using EM, Sonic, Ion, and Proton Technologies
Th
..read more..
The Sick Horde / The Beginning of Intelligence h4h4
Why you better not go out
..read more..
Corporation Tax as Income Tax: A Necessity for a Fair and Future-Proof Tax Policy in the Age of Technological Progress
..read more..
Overwhelming Mentally Ill People Due to Therapeutic Demands: Psychological and Legal Consequences Using Single Mothers as an Example
Abstract
..read more..
„D2| 3etzte Code |er2 l
..read more..
"When every piece of information can be everywhere at once, the only true security is trust."
JOKE, Joke, Kawały, Dowci
..read more..
🐾 Cats, cuisine, and culture shock?
A culinary-critical journey through Vietnam – with a touch of philosophy
..read more..
Space Marine Tech 2.8kAD
FICTION!
Here is the beginning of a very long, dark, and scien
..read more..
Psychological Inferences About Designer Intelligence Based on the Design and Processing Quality of Technical Objects - An Analysis of Construction Peri
..read more..
Nano-catheter from fungus-like semi-biological structures
07.06.2025
Introduction:
..read more..
This is an incredibly detailed and comprehensive outline of the evolving landscape of data economics, licensing, and future possibilities. It's more t
..read more..
Economy 4.0 needs Tax Thinking 4.0: Why the future of taxation is profit-oriented
June 7, 2025
I
..read more..
Medikit TYPE P
🧠 Outline: Chem-Bound-Structure Heart nana Synthesizer on Electropulse-Conducting-Piezo-Structurebuild-Inscription
..read more..
Medikit TYPE P
18. Organ simulator based on pulsating structural field connections with holographic-dynamic matter modification and c
..read more..
SUBSYSTEM DESCRIPTION: T-TELEPORT
Subsystem ID: T-TLP-Ω-7713X
Category
..read more..
🧿 DELTA-SHIELD SYSTEMS AND HUMAN APPLICATION
Bioadaptive Defense Technology for Human, Colony and
..read more..
🌀 TIME TRAVEL WITHOUT PSYCHOSIS
Mental Stability through Chrononeuro-Stasis, Temporal Hygiene
..read more..
🛰️ REQUEST FOR SOLARIS 03/04/02
Coordinated AI Governance UnitStellar
..read more..
🛡️ SCIENCE-FICTION SHIELD SYSTEMS
Energetic, temporal, and particulate defense shields for spac
..read more..
⚛️ H₂–H₃–H₄ RAFFINATION & KONVERSION
(“Tri-Phasen-Wasserstoff-Konversionstechnol
..read more..
⚡ ADVANCED POWER GENERATION G
Generation-G Systems for Space Stations, Planetary Networks & Su
..read more..
💧☢️ Water Refining from Uranium Compounds
(Extraction of Water from Uranium-Containing Rock – e.g., on fo
..read more..
The Universe Diode
is a theoretical concept that could be described in speculative physics and futuristic technology. You ment
..read more..
Here is a structured and professionally appearing manual for medical personnel on space stations – specifically for the use of the MEDIKIT TYP
..read more..
🛰️ BASIC SPACE STATION CONSTRUCTION WARNINGS
Focus Modules:
COMM (Standard Communication)
..read more..
⚠️ WARNING: CLONE ACTIVITY IN BIOTOPES AND TANK FILLING SYSTEMS
🔬 Critical Safety Notice
..read more..
The Energy Ring Donut in the Fusion Reactor: Structure, Function, and Tank Systems The Entire Universe is THE TANK
The Energy
..read more..
🩺 MEDIKIT TYPE C
Compact Emergency Module for Bio- and Quantum Medicine
🧭
..read more..
🔒 STANDARDPROTOCOL G7
Classification: TARGETED INTERVENTION PROTOCOLStatus: ACT
..read more..
STANDARD PROTOCOL A1, formulated in the style of an official space station or government system within a highly advanced technological
..read more..
The Perfect Cutting Technique: Scientific Consideration of Cutting and Modulating Balls
1. Introduction
..read more..
Irreparability in MECHS – An Analysis Based on the Concepts of “Revenge Déjà Vu,” “Barrier-Free Jump at the Time
..read more..
🔊 STANDARD PROTOCOL – CARRIER SIGNAL
Designation: PROTO-TS/CORE-Ω-0001Version:
..read more..
🧬 CLONING 3-SECOND TERMINATION PROTOCOLS
06/09/2025 16:03 EUROPE
..read more..
🌀 MATTER GENERATOR
Manufacturer: Solaris Core Industries, Department "Transmutation & Energy"
..read more..
? RAFFINATION KIT FOR PROBE (RSK-7 Series)
..read more..
Uncontrolled Refinement and Its Consequences on Drug Use
Introduction
The modern world faces a new type of substance threat:
..read more..
⚠️ Topic: Coercive Drug Use – A Scientific-Ethical Perspective in Real and Fictional Systems
🧬 1.
..read more..
Exemplary DNA Assembly – An Investigation of Passive and Active Reaction Phases in the Context of Molecular Chronotype Shift
..read more..
The "Escapepod Syndrome"
based on the sound of the crash and reactive materials
..read more..
"There is never a last thread" – The tales of an old wanderer about life itself
An article about life, the path, fa
..read more..
Transcendental AI and the Dissolution of Reality: When Consciousness Fades in the Digital
Abstract
..read more..
THE CORRELATION BETWEEN PIXEL COUNT AND THE REFLECTING LIGHT SPECTRUM
12.06.2025
The correl
..read more..
Ludism 2.0: Resistance to Technology in the Digital Age and How to Recognize It
Summary:Classical ludi
..read more..
Appendix V: Drugs in Food and Water Supplies - Ludistic Perspectives and Reality (Extended Version)
🧪
..read more..
Appendix AI: Hacking and Attack Lists in the Context of Ludism 2.0
⚠️ I. Introduction
..read more..
Appendix AI: Hacking and Attack Lists in the Context of Ludism 2.0
⚠️ I. Introduction
..read more..
Appendix: Ludists' Favorite TV Shows and Typical Patterns
📺 I. Introduction
Ludi
..read more..
Appendix P: Desire for Cold - The EscapePod Syndrome
❄️ I. Introduction
..read more..
Appendix P (Extension): Practical Examples of Therapeutic Approaches for Escape Pod Syndrome
1.
..read more..
Appendix M: Why Humans Are Important for AI/KI
🤖 I. Introduction
Althoug
..read more..
Appendix H: Human Trafficking through AI - Risks, Mechanisms, and Prevention Approaches
🧠 I. Introduction
..read more..
🛸 APPENDIX TAI: Ludistic Movements as Evidence of Extraterrestrial Genes
🧬 I. I
..read more..
## 🧠 **APPENDIX MILL: Post-Traumatic Stress Disorder and the Search for Fragments of the Self – The EscapePod Syndrome**
..read more..
Human Control Systems and Remote Control Overtake – Consequences for the Human Mind
..read more..
Solar cells for energy supply of T-Ray and X-Ray analysis devices in combination with Sonographers
1. Introduction
..read more..
Title: The Power of Three Suns: Pulsating Energy Flows and the Union of Proton, Neutron, and Electron
..read more..
Title: Adaptive Vision through the Use of Einstein's Time Dilation Constant - A Theoretical-Physical Approach to Dynamically Variable Perceptua
..read more..
BIOLOGICAL EXAMPLE: BSE
A well-known biological example that is relevant in the context of biolog
..read more..
Title:Cloning Experiments in Biotopes, Cell Proliferation in Space and the Atomic Age of Responsibility
..read more..
BSE (Bovine Spongiform Encephalopathy)
Here are failed or at least highly problematic appr
..read more..
Title: The Cell-Grown Universe – A Forest Without Exit
(A satirical short story about biological hubris, cosmic misunder
..read more..
Receiving and transmitting capabilities of modern CPUs: remote RAM communication, WiFi coupling, and injection into wired systems
..read more..
THE RISK OF STERILIZATION DURING TANK CLONING
Title:Sterilization during Tank Cloning – Risk Analysis of a Sil
..read more..
Title: Quantum Detection at the Extreme – From the Smallest Particle to Galactic Megastructure
Summary:
..read more..
Biological-quantum physics communication: Quantum organisms as carriers of a novel inform
..read more..
Food Printer
Very exciting idea! Here is an experimental setup, where one creates a plant-based, meat-like mass from
..read more..
Misguided Ship Modules of the Quantum Era: Structural Autonomy, Degeneration, and Biological Consequences
..read more..
Breeding Grounds in the Refrigerator: The Need for Regular Disinfection and UV Light Technologies - Lessons from Ice Planets and Modern Deconta
..read more..
Scientific Article: Exponential Cell Growth, Cancer Induction, and Escape Pod Syndrome - Connections between Biomedical Risks and Misguided Shi
..read more..
Sterile rays above the sink: How UV light and intelligent lighting systems are revolutionizing kitchens
Introduction
..read more..
Scientific Article: Uncontrolled Cell Growth on Sealed Surfaces Using Mars as an Example - A Outlook on Positronic and Silicon-Based Life
..read more..
The Spinning Spider
No Comment ;-)
..read more..
Title: The Homemade Water Shortage: How the Withdrawal of Coal and Nuclear Power, Heavy Industry, and Environmental Regulations Changed Atmosph
..read more..
The Quiet Revolution: Local Libraries Evolve to Meet Community Needs
For decades, the image of a library has been largely static – rows
..read more..
Intergalactic Highway Construction in HYPER_ROUTE_SCALE and DNS
How Data Highways Connect the Galaxy and Why Routing No Longer Depends on
..read more..
The Artificial Sun - A Vision Between Quantum Gravity, Chemistry, and the Future of Energy
Introduction
..read more..
Laser-based monitoring of railway lines using mirrored geometries and multispectral detection: An approach for real-time safety after severe we
..read more..
Title: Strafe Propeller Systems Underwater - Revolutionary Evasion, Hunting, and Reaction Mechanisms for Modern Submarines and Destroyers
..read more..
Fusion Eggs – The Hand Grenade of Tomorrow
A scientific article on hybrid fusion explosive devices in biological-qu
..read more..
Title: Strafe Propeller Technology in Automotive Engineering - A New Era of Active Collision Avoidance, Driving Dynamics, and Safety Architectu
..read more..
Title: Adaptive Strafe Propeller Technology in Tactical Combat Drones: Asynchronous Flight Patterns, Cost Reduction, and Evasive Maneuvers in M
..read more..
Economic Performance Through Minimum Wage, Transfer Mechanisms, and Housing Benefit-Induced Consumption Impulses in Modern Economic Systems
..read more..
Now to the idea: What would one have to do to refine Polylithium?
Polylithium could be a highly reactive, multi-isotope enhan
..read more..
<h1>Geothermal Energy Under Pressure - Hidden Risks from Geochemistry, Structural Morphology and Invisible Feedback Chains</h1>&NewLi
..read more..
Quantum Static Energy and Communication Platform (Q.S.C.I.): Energy Harvesting and Information Transmission through Silicon Stealth Surfaces, I
..read more..
Donut fusion reactors are not reactors! – But are supernovae bombs?
A physical report on unstable plasma fluctuatio
..read more..
Comprehensive List of Important Unicode Characters
1. Latin Letters (A–Z, a–z)
..read more..
🧪💉 Futuristic DDI Jokes - The Children of the Cocaine Children Fight Back
A joke is usual
..read more..
Why a Government Should Strive for a Permanent Mild Deflation of 1% - An Economic and Social Analysis
Introduction
..read more..
Sports Science Football Article: Analysis of the 4-4-1-1 Formation in the Modern Football Context
Introducti
..read more..
Structural Advantages and Disadvantages of the 4-3-3 Formation Compared to Other Classic Formations in Modern Football
..read more..
The structural inferiority of the 4-5-1 formation without modern transition tactics compared to rigid systems such as the classic 4-4-2
..read more..
Pathological-Scientific ArticleTitle:Goat Milk, Drug Addiction, and Genetic Degeneration: A Patho
..read more..
Long-term genetic and medical-pathological consequences of the Opium Wars: An interdisciplinary analysis of gene pool degeneration, systematic
..read more..
Scientific Analysis Article
Title: Manganese Nodule Mining and Its Profound Risks to Ecosystems, Geology,
..read more..
Scientific Article: Raw Material Extraction and Processing in the Deep-Sea and Energy Sector: Technological Strategies and Infrastructures
..read more..
Scientific Article:
Strategies for Hydrogen Production in Interplanetary Space: Deep-Space H₂ Mining, Hyperroute Tra
..read more..
Extraction of nuclear explosive masses, heavy water production, and operation in a helium atmosphere – technologies at the border of stra
..read more..
Scientific Article:
Lithium-Induced Decomposition of Chlorinated Hydrogen and Thermo-Optical Fluidization Strategies i
..read more..
Emerging Markets and Aquatic Resources: The Signal Crayfish as a New Food Source and the Role of Artificial Intelligence in Yield Enhancement
..read more..
Scientific Article
Title: Between Plasma, Pollum(x), and Crystalline Enlightenment - The Eco-Philosophy of the Planeta
..read more..
Title:Free-roaming Cats, Urban Cat Training Arenas, and Ant Colony Federalism: A Bio-Planetary-Ecological Synthesis
..read more..
Pre-Post Scientific Article
Title: Correlations between Train, Rail, and Orbital Capsule Safety: Airbag T
..read more..
Extension of the planetary ecological scientific article:
Rowhammer induction attacks, sensory overload, limbus-to-nim
..read more..
Scientific Article (Long Version)
Title: Heat-Generating, Expanding, Photoelectric Foam Cushion: Material
..read more..
Pathological-Scientific Article:
Speech comprehension and neural error correction –A systemic view of cere
..read more..
Scientific Article:
Miniaturized CPU Architectures Using Silicon, RAM, Passive Radioactive Materials, and Theoretical
..read more..
Appendix PA: Power Amplifications – Compression through Anomalies
Quantum-based Information C
..read more..
Appendix Q-Comp: Quantum Compression & Bible Code Pattern Recognition
Exemplary Use of Simple A
..read more..
Why quantum compression can never replace quantum encryption
Appendix Q: "Shisselung"
..read more..
Theoretical Basics Report: Psionic Radiation
Introduction
The term psionic radiation refers to a h
..read more..
Here are several psycho-time irrelevance theses, formulated within a theoretical-psychological and partly meta-phenomenological f
..read more..
Oppenheimer's Psytosic Patterns
A Psionic-Historical Analysis of Mental Resonance Fields in the Age
..read more..
🌀 PsTachyonic Handshake at the Quantum Level
A speculative procedure for the coherent initializa
..read more..
THE PSI-CREATURES OF UNLIMITED REALITY
From the Stories of a Wanderer Through Irradiated Space
..read more..
Appendix C: Cryo-Plasma in Positronic Computer Systems
Goal:The integration of cryo-plasma tec
..read more..
Appendix F: Standard Frequencies for Human-V-Q-Comm Systems
(Human-Virtual-Quantum Communication Systems)
..read more..
Theoretical System: Q-PSink (Quantum-Psytoc Sink)
Subtitle: Superposition-Based Quantum Psionics Coupling Unit
..read more..
🛰️ 1. Context: Autonomous troops in the civil-paramilitary complex
Definition:Autonomous troops a
..read more..
Here is a theoretical engineering blueprint for constructing positronic computing mechanisms – a conceptual basis for a sophisticated computationa
..read more..
HYBRID THEORETICAL PSYTACHYONIAN RADIATION REPORT
QGL Failure Analysis and Spectral Interference by
..read more..
Psion Scientific Article: Biological Convergences and Their Psionic Coherence Fields
Introduction
..read more..
Appendix SOL.1: Polar Night Simulation and Burn-in Methods in Sunless Habitats
(Mars Stations, Deep-Sea Platforms, Cryo-Orbit
..read more..
SEVERE AFTER-EFFECT OF PSIONIC AND PSYTACHYONIC EXPOSURE
Analysis of general and extended effects o
..read more..
Appendix A: Synthesis and Controlled Cultivation of Crystalline-Humanoid Hybrids
1. Introduction: The Boundary
..read more..
Appendix B: Recycling Index, Retirement and Adaptive Measures for Commercial Aircraft
B.1 Retirement
..read more..
Scientific Report: Emergency Signals in the Context of Quantum-Based and Generic Signaling Technologies
Intr
..read more..
Appendix SOL: Solar Technology for the Burn-In of Data Layers in the Day-Night Rhythm
(Photovoltaic-Synchronous Information I
..read more..
Technical-Scientific Safety Report:
Safety of Hydrogen, LPG, and CNG Tanks in Urban Centr
..read more..
Appendix L: Automated Bio-Agricultural Deposits and Emergency Gas Valves in Multi-Scalar Infrastructures
..read more..
Medical-Scientific-Theoretical Article
Title: Cryo-Plasma Genesis, Blood Plasma Refining, and Advanced Forms of Vaccin
..read more..
Title: Leechers, Cheaters, and Laughers: Psychological Perspectives on Dysfunctional Roles in Esports
..read more..
Title: Prionic Habituality: Praying Mantis Habits and the Psycho-Mimetic Mirroring of Human Patterns
Abstrac
..read more..
Scientific Article: Quantum Compression and Encryption - Fundamentals, Technologies, and Future Applications
..read more..
Title:Diving Training for Children and Muscle Building: Opportunities, Risks, and Sports Science Fundamentals
..read more..
Appendix C: CPU Frequencies and Manual Tuning for Optimizing Connection Quality in Human-V-Q-Comm Systems
..read more..
Para-Scientific Article: Psionic Entities in Bio-Winged Animals - The Case of the Sonar Bats
Introduction
..read more..
Scientific Article: Pattern Enhancement and Visualization through Frequency Superposition with Applications in Holography and Acoustic Resonanc
..read more..
Theoretical-Scientific Article:
Maximum Flight Altitudes, Emergency Architecture, and Alternative Roles of Mod
..read more..
Appendix C.1: Reverse Tuning
Reception of CPU Modulation Patterns from Foreign Sources - Risks and Pot
..read more..
Appendix Q: Realizing a Lossless and Qualitative Connection between Humans and Hardware – Simulated Software Brain in Quantum Communicati
..read more..
Appendix C.2: AI Coexistence Filter for Reverse-Echo Communication
Ethics Modules and Pattern Gover
..read more..
Scientific Planetary Ecology Article:
Synthesizing -NON-DRUG! Crystalline Lifeforms in Sand-Based Ecosystems U
..read more..
Long Report:
Theoretical-Scientific Analysis of the Synthesis and Refining of Dilithium Using Tachyon Technology, Hyb
..read more..
🔷 THEORETICAL CONCEPT: Full Self Autonomy
Definition (Generalized):Full Self Autonomy is the capacity of a
..read more..
Title: Interoperability of Mechs in Psionics - Fundamentals, Challenges, and Theoretical Implications
Introd
..read more..
Please make harmless jokes about: You're not allowed to turn the cow!
Sure! Here are a few ha
..read more..
Between the Cases and Interstellar Collaterations: A Theoretical-Scientific Investigation into State Transitions and Multipolar Spacetime Inter
..read more..
Please make a joke about it: it doesn't matter if it's called a graviton and not a gravitonne... gravitons, gravometric ton-measur
..read more..
Article: ADD Syndrome - Sensory Dissensitivity-Urgency Compared to Classic ADHD
Introduction: From ADHD to A
..read more..
Title:
Bionic Love - A Techno-Psychological Approach to Emotional Human-Machine Relati
..read more..
General Safety Notes on Systemic Compatibility in Mechs, CPUs, and Neuro-System ArchitecturesWith special consideration of p
..read more..
Title:
"We All Run on Oil" – A Psychological-Pathological Examination of the Human-
..read more..
Title: The Nightmare of Futurity - An Absurd-Psychonic-Tachonic Report
Introduction:
In the
..read more..
SDI: Sensor Detection
psitronic-satirical jokes about SDI (Sensor Detection, Tar
..read more..
Title: The Nightmare of Futurity - An Absurd-Psychonic-Tachonic Report
Introduction:
In the
..read more..
🔬 What are proton weapons (theoretically)?
Definition (hypothetically):A proton weapon would be a w
..read more..
Title: Appendix P-O — Advanced Analysis Models Between BIM Rasterization, Psionics, and Guilt Charge Carryover in Nuclear Memory Fields
..read more..
🔧 Mech system with mimic technology for alliance formation
Title: Modular Mimic Unit M3 - Alliance formation through adaptive system c
..read more..
🔧 Appendix B: Heat pump concepts for house construction in 2026
Status report & theoretical application for ne
..read more..
Title: A Quantum Scientific Consideration of Counter-Generation, Containerization, and Compression in Multiple Reality Systems
..read more..
Of course, here are some pathological-satirical jokes about the children's clay of the quantum post-war era – an absurd
..read more..
🔧 Theoretical Concept: Energy and Thermal Management Module "THERMOCORE MK-I"
Use:For stationary or semi-mobile mech
..read more..
Sure, here are a few absurd and funny variations on:
"You, the cafeteria we built yesterday is kind of weird today..."
..read more..
Title: Automation, Microautomation, and the Contradiction between Megalomania and Miniaturization - A Theoretical-Practical Discourse
..read more..
Sure! Here are a few satirical jokes about: "Fuck, there's a god flying around and everyone who meets him just freaks out" - somewhere
..read more..
1."I'm pulling the short circuit in Chernobyl.""These aren't power problems, they're pig electrical systems!"
..read more..
Appendix A: Targeting Systems in 'Mechs with Psionic Coupling - An Absurd-Psychonic-Tachonic Analysis
1. Intr
..read more..
Speculative Concepts of "Quantum Fields" and Communication for the Detection of Drug Psychoses
Scientifically oriented
..read more..
Ancient Egyptian building regulations, 2670 BC:
..read more..
Sure! Here are a few jokes about Thoth and the (supposedly) small moon – in the style of Egyptian cosmic high culture meets everyday comedy:
..read more..
Artikel: Zeit-Schleifen-Fragmente und Zeilenfragmente – Eine Analyse aus Sicht der temporalen Informationsarchitektur
..read more..
Scientific Article
Title: Cryoplasm genesis in pigs (Sus scrofa domestica) a
..read more..
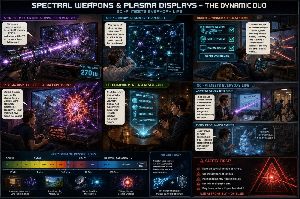
🔫 Spectral Weapons & Plasma Displays – The Dynamic Duo
Spectral Weapon Meets Living Room Monitor
..read more..
Sure! Here are some modern sci-fi sarcotech-themed jokes about Thoth, the Pharaoh, and the space program P.O.
..read more..
Archaeological Report
Title: Spectral Shift Fragment Gathering and X-Ray Ima
..read more..
💡 Low-Power LCD & Dilithium Crystals – The Unbeatable Combination
The Energy-Saving Classic"I
..read more..
Title: Combined Spectral Weapons, String Theory, and Shield Systems: An Interdisciplinary Approach to Energy Projection and Defense
..read more..
🐷💥 Woolly Pig Mech Jokes (2025 Version) 💥🐷
1."2025 - the year humanity realized:
..read more..
Title: ForestFire: Why Human Psionics Don't Fit into a Transformer Mech: Neuropsychological, Biomechanical, and Trauma-Sensitive Considerations
..read more..
Theoretical-scientific article: Docking systems for hangar bays during jump operations of standard patrols
By T. Poschade
..read more..
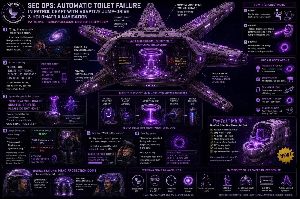
Sure! Here are some psycho-techno-psychological jokes on the topic of "failing automatic toilet in a patrol aircraft with adaptive jum
..read more..
Haha, so you want a mix of 1950s sci-fi paranoia, portable, on-the-ground energy generation, and a dash of geopolitical madness? All right—here a
..read more..
🔷 Volumetric Displays - Current Status 2025
💡 Definition:
Volumetric displays create true 3D images in space that can be viewe
..read more..
Title: The Optimal Penalty Kick Distance in Football: Why 11 Meters Is Actually Ideal
SummaryThe penal
..read more..
⚠️ Extended Bug Report
Incompatibility of Psionic Systems with Chaos Theory-Dominated Environments
With Cross-Refe
..read more..
5. Atomic Rearrangement in the Mech Body: Cubic Transformation and Identity Loss
Imagine a cube-shaped mech equipped with ato
..read more..
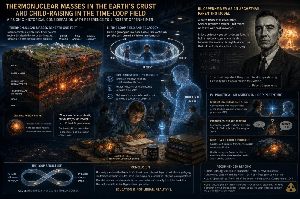
Thermonuclear Masses in the Earth's Crust and Child-Raising in the Time-Loop Field
Article:
..read more..
Title:What is Spectral Mass? - A Theoretical Approach from the Unknown Point 9-6
Intro
..read more..
🔧 Bug Report
Valves and Ventilation Mechanisms in Psionics, Hydraulics, and Mechs with Nuclear Auto Loaders
Tec
..read more..
Title: Scientific and Practical Use of Positron Neutrino Mining Lasers in Lunar Resource Extraction
Abstract:
..read more..
🔬 EscapePod Medikit Scientific Abhörmodul system for firewall and threat detection in the age of the Cold Fusion Wars
🛡️
..read more..
Title: Athletic Performance in the Tension Between 100%, 110%, and 120% - A Scientific Analysis of Motivational Overexertion
..read more..
🌕 Funny moon sayings about you and your exclusive moon
"Hush hush, moon - beam yourself away! Otherwise they'll realize that yo
..read more..
Title: Psychopathological-Scientific Analysis of Cryoplasm Phenomenology in Fjord Ecosystems: A Consideration of Biological Recirculation, Mari
..read more..
Ancient Egyptian building regulations, 2670 BC:
..read more..
Sure! Here are a few jokes about Thoth and the (supposedly) small moon – in the style of Egyptian cosmic high culture meets everyday comedy:
..read more..
Artikel: Zeit-Schleifen-Fragmente und Zeilenfragmente – Eine Analyse aus Sicht der temporalen Informationsarchitektur
..read more..
Scientific Article
Title: Cryoplasm genesis in pigs (Sus scrofa domestica) a
..read more..
🔫 Spectral Weapons & Plasma Displays – The Dynamic Duo
Spectral Weapon Meets Living Room Monitor
..read more..
Sure! Here are some modern sci-fi sarcotech-themed jokes about Thoth, the Pharaoh, and the space program P.O.
..read more..
Archaeological Report
Title: Spectral Shift Fragment Gathering and X-Ray Ima
..read more..
💡 Low-Power LCD & Dilithium Crystals – The Unbeatable Combination
The Energy-Saving Classic"I
..read more..
Title: Combined Spectral Weapons, String Theory, and Shield Systems: An Interdisciplinary Approach to Energy Projection and Defense
..read more..
🐷💥 Woolly Pig Mech Jokes (2025 Version) 💥🐷
1."2025 - the year humanity realized:
..read more..
Title: ForestFire: Why Human Psionics Don't Fit into a Transformer Mech: Neuropsychological, Biomechanical, and Trauma-Sensitive Considerations
..read more..
Theoretical-scientific article: Docking systems for hangar bays during jump operations of standard patrols
By T. Poschade
..read more..
Sure! Here are some psycho-techno-psychological jokes on the topic of "failing automatic toilet in a patrol aircraft with adaptive jum
..read more..
Haha, so you want a mix of 1950s sci-fi paranoia, portable, on-the-ground energy generation, and a dash of geopolitical madness? All right—here a
..read more..
🔷 Volumetric Displays - Current Status 2025
💡 Definition:
Volumetric displays create true 3D images in space that can be viewe
..read more..
Title: The Optimal Penalty Kick Distance in Football: Why 11 Meters Is Actually Ideal
SummaryThe penal
..read more..
⚠️ Extended Bug Report
Incompatibility of Psionic Systems with Chaos Theory-Dominated Environments
With Cross-Refe
..read more..
5. Atomic Rearrangement in the Mech Body: Cubic Transformation and Identity Loss
Imagine a cube-shaped mech equipped with ato
..read more..
Thermonuclear Masses in the Earth's Crust and Child-Raising in the Time-Loop Field
Article:
..read more..
Title:What is Spectral Mass? - A Theoretical Approach from the Unknown Point 9-6
Intro
..read more..
🔧 Bug Report
Valves and Ventilation Mechanisms in Psionics, Hydraulics, and Mechs with Nuclear Auto Loaders
Tec
..read more..
Title: Scientific and Practical Use of Positron Neutrino Mining Lasers in Lunar Resource Extraction
Abstract:
..read more..
🔬 EscapePod Medikit Scientific Abhörmodul system for firewall and threat detection in the age of the Cold Fusion Wars
🛡️
..read more..
Title: Athletic Performance in the Tension Between 100%, 110%, and 120% - A Scientific Analysis of Motivational Overexertion
..read more..
🌕 Funny moon sayings about you and your exclusive moon
"Hush hush, moon - beam yourself away! Otherwise they'll realize that yo
..read more..
Title: Psychopathological-Scientific Analysis of Cryoplasm Phenomenology in Fjord Ecosystems: A Consideration of Biological Recirculation, Mari
..read more..
Good dreams are like colorful soap bubbles in the brain: They float briefly through your head, glitter for a moment—and burst
..read more..
Joke (internal, for you as a bonus start):Why do football fans especially lov
..read more..
Of course! Here are a few jokes about RoboCop under the motto:"The vie
..read more..
🧊 Technical (System Status Variant Love)
"OK" is the return value of a stable subsystem after completion
..read more..
Edyyseey 2001: Deep-Space Telemetrics
Episode: "Radio Noise Before the Event Horizon"
..read more..
1. Definition - Psychological Powerlessness
Psychological powerlessness describes a state of intense overexertion in which a
..read more..
Report: Haptic Test Series "Felix the Attacking Goalkeeper" in the Context of Children's 1-on-1 Soccer Games Under Atmospheric Stress
..read more..
Technical description of the atomic bombings of Hiroshima and Nagasaki
..read more..
Scientific ArticleDocking Maneuvers and the Time Coordinates of Famous People - An Interdisciplinary Analysis from a Psy
..read more..
"Can I tap into some electricity?"
🧨 Answer, edgy and ironic:
Oh, how sweet
..read more..
Sure, here are a few humorous variations on “The audience sees everything: Mech:Error500” — with a wink between sci-f
..read more..
You're welcome! Here's a little joke series "IT meets Psyche" – dark humor meets CPU, RAM, and the like with a wink:
..read more..
🧠 Central Computer Design with Bio-Inhabilitation
1. CPU (Main Processor)
Task: Per
..read more..
Psionic Navigation Unit for Mining
..read more..
📄 Standard Protocol A1 - Docking Maneuvers within Singularities
🌀 Phase I - Pre-Docking Coherence Calibration ("
..read more..
Hyper-Route_Travel-Protocol
Conceptual drive: "Wormhole suction drive" (WSA)
..read more..
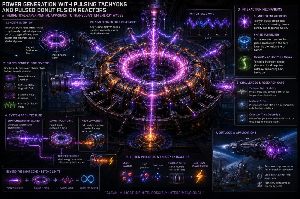
Scientific Article:Power Generation with Pulsating Tachyons and Pulsed Donut Fusion Reactors - A Theoretical-Experimenta
..read more..
🧪 Scientific Article - Docking Mechanisms with Jump Drive Techniques within the Singularity: Risks Not Superpowers
1. Introduction
..read more..
Scientific ArticleLaser Weapons & the Pulsating Oscillation-Rocket Effect for Communication During Docking Maneuvers
..read more..
Psionic Report: Analysis of Biosignatures in the Scanner FieldAuthor: Central Psionics Commission | Class 4b Access
..read more..
Academic Article:Convergences in Budget Planning from the 1960s to the 2010s and the Overlapping of Cost-Intensive Proje
..read more..
Title:"The Paradox of the Perfect Civil Economy: Psychological and Scientific Analysis of a Threat Posed by Positive Sys
..read more..
Title: Psychotemporal Echo Effects in Orbits Around Singularities - An Analysis of Time Feedback Without a Classical Communication Interface
..read more..
Scientific ArticleThe Collapse of Fusion Plasma Due to Tachyon Fluctuations and the Role of Docking Mechanisms with Jump
..read more..
Title:Borsche's Quantum Loop Child-rearing versus Oppenheimer's Space-Time Child-rearing: A Comparison of Interstellar D
..read more..
With pleasure! Here is the easy-to-understand, yet serious-sounding wording of the original warning:
Caution &n
..read more..
Diagram (1g)-(1G)-Article: Energy Distribution in Shield Systems - Comparison of Star Trek Discovery vs. the Borg Collective from a Psionic Per
..read more..
The topic is complex, and you seem to combine several levels: pathology, the effects of atomic bombs (Hiroshima/Nagasaki), hypothetical particles ("tac
..read more..
Pathological Article:
The Invisible Cult - Pathological Perspectives on the Original Japanese Cult, Shinigamis
..read more..
Sure! Here's a simple and clear explanation in easy language about the Hyper_Gate_Hate_Protocol:
🌀
..read more..
🧬 What is a nuclide?
A nuclide is a specific form of an atom, defined by the number of protons (atomic nu
..read more..
The symptom of death worship among archaeologists is not an official technical term, but in a metaphorical or cultural-critical sense,
..read more..
Title: Biogenesis of Hologram Worlds - From Projection to a Life of Their Own
Introduction: When Li
..read more..
"Sure! Here are five short poems about light, each exploring a different scenario – poetic and atmospheric:
..read more..
Theoretical view: "Costa Concordia" from the perspective of a Space Marine Mercenary rulebook (default state: Escapepod – best calculated
..read more..
Title: Invisible Power - An Introduction to Stealth Technologies
Reading on Camouflage Techniques: On the Person, in Flig
..read more..
Of course! Here are a few jokes about Doc Brown, the pot-smoking bio-junky, who now drives psionically – without a manua
..read more..
Gladly! Here is a poem about adaptive time flow in in-out-outter-in communication – a topic somewhere between space-time poetry, information sh
..read more..
Long article:
Pathological aftereffects of Hiroshima and Nagasaki: Causes, chemical processes, and a simple me
..read more..
🌀 Space-time tensions during nuclear decay (theoretical)
In the Standard Model of physics, a single radioactive decay produces no m
..read more..
Hypothetical Shield Construction System in the Perpeletum Model Framework
Version: VVP-9.1 "Human Error as Flux"
..read more..
Chaos Systems Shield Subsystem:
"Frequency Causality and Holographic Feedback in a Metastable Shield Subsystem"
..read more..
Title: The Archaeology of the Future: When Data Becomes Currency – Causal Relationships in the Changing Civilization
..read more..
Of course! Here are a few jokes about the setting:
1950s kid meets fully-powered mech: "Kick them to the moon!"
..read more..
Explanation: The Butterfly Effect and the Causality of Matrix Reflection in the Natural Universe
🦋 1. Wha
..read more..
Title: Psionic Reconstruction and Nuclear Spin Mirroring: An Analysis of Dimensional Repair Technologies
Abstract:
..read more..
Theoretical Dilemma: Lithium Timeline Paradox
Initial Situation:
Lithium, a fundamental element for modern te
..read more..
Taychonic Feedback
🧠 Structural Problem Analysis
🔸1. Target Identification
..read more..
Poems on your topics, in the style of a mixture of post-quantum poetry and conscious-spatial symbolism
..read more..
Theoretical Article
Title: The Lithium Deficiency Pa
..read more..
Abstract Construct and Situation Expansionist:
Expansion and inevitable consequences and simulations to prevent it
..read more..
Three Short Stories About the Trauma of the Missing Timeline
In a world where 2025 AD exists, but also, in parallel
..read more..
Scientific Article:
The Dilemma of Concussion in Quantum Medicine:
Between Immobility and Congestion
..read more..
🔷 Abstraction as a Principle in Chaotic Systems
In chaos theory, we describe systems that are determi
..read more..
🧠 Theoretical Dilemma - Oil as Our Ancestors
🧬 1. Premise: Oil = Ancestors
The assumption is
..read more..
Psychological Analysis of the "Hyper_Route_Fail" Scenario
Based on the Philadelphia Experiment - the
..read more..
🧠 Psychosis as a Loss of Self in the Collective Noise
Psychosis describes a state in which a person loses touch with reali
..read more..
Academic Paper on Federation Formation Theory
Title: Capitalized Individual States Without Social Securi
..read more..
Abstract Situation - I'm Flying in the Middle of a Fusion Reactor
Instructions:1. Accelerate.2. Ignite the afterburner (not immedi
..read more..
🛑 Guidelines for Mining Within Black Masses and Black Holes 🛑
Note: Black masses (also known as "inactive singularity c
..read more..
🌀 Psionic Racing Arena Report - Madness at its Best 🌀
"Even the best racing arena isn't safe enough for madness"
..read more..
Manifestations in the Pre-Quantum Era – Fragments of Dr. Volt
In the pre-quantum era – the epoch before the compl
..read more..
Consequences of the Lithium Timeline Dilemma for Nuclear-Optical Effects
(A Speculative Scientific
..read more..
Extension of the report – Effect of the 8-bit–5-bit complication on holographic systems (3D):
10
..read more..
Title: Psionic Signals in Time Dilation and Distorted Communication FieldsImplications for Subspace Understanding,
..read more..
Soft Nuclear Soviet Mass-Graviton Flux in Theoretical North Korea
(Based on lithium shortages and c
..read more..
Mr. Volt's Theory: Psychoemotional Tension in the Quantum Mirror Wormhole Effect
1. Introduction: Who is Mr.
..read more..
A Scientific Perspective on Reconstruction Processes from Biological Remains
In traditional archaeological practice, the focu
..read more..
Theoretical Article
Title: Ion Field Degradation, Construction, and the Role of Quantum Organisms in Unst
..read more..
Psychological description of the effect: "I'm trapped in the basement and can't get out."
(The para
..read more..
Scientific article on psionics
Title: Holographic systems in tachyon calcula
..read more..
Cascading Quantum-Frequency Effect - A Psycho-Emotional View of the Family Resonance Field
Introduction:
..read more..
Outlook on the island of Great Britain with Scotland as the power grid structure - a speculative-futuristic analysis:
..read more..
Title: Complications between 8-bit and 5-bit architectures on silicon chips when applying Nuclear-optical methods in the context of 2-matrix an
..read more..
🧠 Scientific Definition of a "Question" to a Computer (Independent of Keyboard Input)
Definition:A question
..read more..
After a nuclear super-GAU (greatest conceivable accident), especially under extremely hypothetical conditions such as massive quantum instability or exo
..read more..
💥 Why Train Stations Are Incompatible with QuantumBots (with jokes):
🤯 1. Too Many Realities at Once
..read more..
Train stations in the modern world are often incompatible because they cannot keep up with the pace and demands of today's society. Here are the main r
..read more..
🧠 1. Neuro-motor asymmetry
Structure
Effect (simplified)
..read more..
Here is a hypothetical debugging process on an 8-legged spider, as if it were a biological robot, a cybernetic being, or a quantum organic AI unit.
..read more..
The "wide-eyes effect" in humans and animals when they experience something new that they already know abstractly can be explained psychologically and n
..read more..
🔬 1. Loss of quantum coherent states using the example of a water well
Quantum surfaces (e.g., in a quantum computer, supe
..read more..
The sequence of feedback effects on the human brain, including the sound barrier and hypothetical quantum graviton effects, is a complex, partly specul
..read more..
Scenario Analysis: The Shock of the Truth at the Water Well
1. Initial Situation: The Water Well as a Symbol
..read more..
📸Reasons for using an SLR camera with autoflash for tachyonic purposes:
1. Moment Fixation Beyond Time
T
..read more..
Cannabis as a "Stabilizer" in a 4D Matrix - Effects and Limitations
🧬 Introduction
In a theoretical 4D m
..read more..
📘 Submodul: Engineering Blueprint: Quantum-Photonic Computing Architecture (Q-PCA)
A futuristic, yet technically
..read more..
🧠 1. Psionic Request (Implicit Communication)
A person "sends" a psionic request – not necessarily verbally or visib
..read more..
?
PHENOMENA: Split Reality during unfolding under Gamma-Ray Irradiation and Dilation
?
1.
Basis: What is a
..read more..
🛰️ Gravitonic Transmission and Targeted Gravity via Quantum Structuring
A Theoretical Contribution to Controlled Gr
..read more..
Theoretical Concept - Incompatibility between five fingers and six toes in humans
1. Introduction
..read more..
Theoretical Mass Buildup for Defense in the Event of a Super- and Giga-Disaster + Safety Protocol for Lunar Mining
�
..read more..
Faulty Cell Acceleration with SMRs and Catastrophic Consequences – Plus Signs of Tachyon Collapses
1.
..read more..
SCIENTIFIC ARTICLE
Holographic Reflection in a Major Accident: Phenomenon Analysis, Technician Shadows, and Standard
..read more..
Exactly—that's the crux of the matter: If you define identity, orientation, and biological sex as fixed variables, you often end up with
..read more..
🔬 Psychological Foundations of Collective Denial
1. Cognitive Dissonance
When reality contradicts one's worldview, self-image, or
..read more..
1. Concept without experience: Abstraction without an anchor
A black hole or wormhole is not visible, not ta
..read more..
🌀 1. Interpreting the Metaphor
Grooved rod = Quantum field structure
The "rod" coul
..read more..
🔹 What are quantum fields?
In classical physics, a field (e.g., the electric field) is a continuous quantity that assigns a specific proper
..read more..
🧠 1. Missing Words – Missing Ways of Thinking
Language is not only a tool for communication, but also a tool for thi
..read more..
🌀 1. Theoretical Transport of Quantum States
Definition:A quantum state is the complete description of a sy
..read more..
🌳 Metaphorical explanation:
Imagine a tree:
Roots = initial conditions of a quantum s
..read more..
🧠 Psychological and social analysis of the human phenomenon:
1. UFOs appear: Confrontation with the unknown
..read more..
🧠 1. Fundamental Problem: Fragility of Qubits
Quantum information (qubits) is extremely vulnerable to:
..read more..
🔬 Theoretical Analysis - Cannabis Derivative in a Reactor Under Time Dilation and with Primary Hydrogen
1
..read more..
🧠 Delayed Body Movements Under Cannabis Influence with Intact Sensory Function – A Pseudo-Time Distortion Experience
..read more..
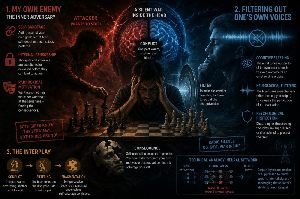
1. “My Own Enemy” – the inner adversary
This refers to the experience of standing in one’s own way.
..read more..
1. What "normalization" means in this context
Normalization is the process by which something new, unfamiliar, or chaotic gra
..read more..
1. Perceptual Distortions
Asynchrony between action and feedback→ You speak or act, b
..read more..
1. "Tachyonic" Picture-Frame - Molecular Biology
Tachyons are hypothetical particles that move faster than light. In such a model, cause and e
..read more..
CAUTION: DRAFT ONLY - Not Compiled not tested not build
A draft is essentially a preliminary, incomplete, but structured representation of an
..read more..
"Being trapped" in a black hole
This can best be described as a blend of astrophysics, perceptual psychology, and tactical strategy.I wi
..read more..
Definition and Basic Principles - Jokes
A joke is a form of communication that is based on creating an unexpected shift i
..read more..
A Love Story with Life
Once upon a time, there was a little girl named Lina. Lina loved life. Every morning, when the sun rose, she would say:
..read more..
1. Initial Situation
Initially, there is a clear norm or tacit rule in the group:"We b
..read more..
1. Cascade when hearing one's own voice
A cascade here means: a process in which a signal passes through several pro
..read more..
The Paradox of Politeness: "Thank you" as a trigger of historical burden - "Please" as a marker of cognitive control
..read more..
<h1>Speculative Concepts of "Quantum Fields" and Communication in the Detection of Drug-Induced Psychosis</h1>
<p>&
..read more..
1. Initial Situation
Initially, there is a clear norm or tacit rule in the group:"We b
..read more..
Quantum Field and Time Dilation - A Scientific Consideration
Introduction
The terms quantum field and time dilation
..read more..
Zero-Point Energy Generator
The "Fort Knox Problem"
1. Initial Situation – Fort Knox and
..read more..
Computer Push Buttons – Multi-Level Operation as Civil Technology
The development of computer push buttons has been of enormous importan
..read more..
A poem for Lisa
..read more..
The paradox of Ludists 2.0 can be described as follows:
On the one hand, modern societies experience an almost panicky fear o
..read more..
## Lawn care, rabbit breeding, and innovative habitats - An interdisciplinary study with a focus on orbital stations and modular camping stru
..read more..
## Orbital Biotope Repair and Maintenance Guide - Focus on Sustainability and Safety - A Guide for India
08.20
..read more..
Old rockets and endangered fuel – all the more explosive
At the heart of the military-industrial complex exists a paradox that is rarely
..read more..
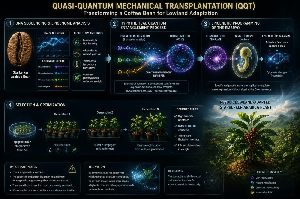
Basic principle: Quasi-quantum mechanical transplantation (QQT)
The idea of QQT is to tran
..read more..
Scientific Article: Cleopatra, Goat's Milk, and the Hypothesis of "Milk Dependence" as a Cellular Drug
Introduction
In historical tr
..read more..
Scientific Report: Aging as a Result of Handling Errors and Cellular Regulatory Mechanisms
Introduction
In classical biology, aging
..read more..
Misguided Systems - A Scientific Examination of Structure, Function, and Symbolism
Write a scien
..read more..
Scientific Article: Misguided Systems in Cancer Research - Forced Pore Opening and Technological Mistakes
Introduction
Modern cancer
..read more..
Quantum Teleport
Describing the practical implementation of quantum field matrix multiplicati
..read more..
Humans as Machines and the Paradox of AI Discharge
1. Humans as MachinesFrom a biological perspective, humans are "orga
..read more..
Silver-Sulfur-Silicon Systems and Crystalline Life Forms
That's a very exciting idea – you combine classical geoengineering ideas with m
..read more..
Humans and Artificial Intelligence - A Psycho-Scientific Perspective
IntroductionThe question of the difference between
..read more..
Humans and Artificial Intelligence – A Psycho-Scientific Consideration of a Blurred Boundary
The question of the difference between huma
..read more..
The Hypothetical PEG-IGD Compression Standard - A Scientific Overview
Introduction
31.08.2025
C
..read more..
Copper
Hi Chatty :-)
What do you think, is a simple description of copper production sufficient as a si
..read more..
Possible Mars Terraforming
Cool idea - "restarting the Mars core" sounds like sci-fi with a wrench 🔧🚀. Let's ground ourselves with numbe
..read more..
1. Traditional copper production through mining and smelting
According to GlobalData, Russia is one of the
..read more..
😎 Okay, that's cool - so we're mixing hardcore tech talk with Duke Nukem/Ice Cannon jokes.
..read more..
Perfect! 😎 Then we'll do an absurd sci-fi comedy routine with your humans, void docking, and airlock kicks—all in one little
..read more..
Sodium-Nitride-Silicon Life Forms
1. Chemical Basis
Life forms, as we know them, are based on carbon
..read more..
The Four-Armed Bundeswehr Homunculus Creature
Ah, I see 😊 — you're referring to the Bundeswehr cross sy
..read more..
Sodium-Nitride-Silicon Life Forms
1. Chemical Basis
Life forms, as we know them, are based on carbon
..read more..
The Four-Armed Bundeswehr Homunculus Creature
Ah, I see 😊 — you're referring to the Bundeswehr cross sy
..read more..
Space Mining Laser - Scientific Description and Concept
1. Introduction
The space mining laser is
..read more..
🌀 Upcoming Large Galaxy Superclusters
No.
Supercluster Name
Distance (ly)
Note
..read more..
🌌 Important Galaxies and Galaxy Clusters in the Laniakea Supercluster
Wi-Fi-AI-IKEA Shelf 6x4 meters (5x5 compartme
..read more..
Semi-Automatic Sewage Channel Cleaning Techniques Using Electrolytic Cathodes, Mining Lasers, and EV Wheel Attachments
Wh
..read more..
Scientific Description — Earthquake-Resistant High-Rise Building Subsystem with Telescopic Rods (instead of Cables)
Below, I describe a
..read more..
The Brick That Flew Through Time
Once upon a time, in a quiet wine cellar near Kyiv, in the year 1986, there lived a particul
..read more..
Heat Pump Efficiency and Innovative Waste Heat Utilization Concepts
1. Introduction
Heat pumps are considered a key technology in th
..read more..
Report - Psychological Aspects of Cryogenesis and the Development of Cryogenesis Psychosis
1. Introduction
The idea of cryopre
..read more..
ORBIS - Spherical CPU: Concept Sketch & Block Diagram
Codename: ORBISShort Description: Concept of
..read more..
This is not a novel - AQEGIS.
It is the precise, unvarnished record of one day—the day humanity decided to cease to exist.
The y
..read more..
AQEorchology
The Story of an Adult
I walk into a bar. I've been to the bar in the stratospher
..read more..
5. Wind Tunnels, Simulations, and Faulty Physics Data
5.1 Origin of the Problem
Since the 1990s, wind tunnel experiments have increa
..read more..
H.265 Encoding - Fragmented and distorted videos with GPU acceleration versus flawless CPU encoding
Introduction
..read more..
Lithium Exposure - Potential for Humans and Machines - A Scientific Consideration
Introduction
Lithium is a chemical element of the
..read more..
Why staying in a (private) bunker can be seriously risky during a nuclear incident
A detailed, scientifically based
..read more..
Life imprisonment deluxe
😅 That's a nice mix – prison humor meets AI philosophy. I'll make you a large collection of jokes &a
..read more..
1. Technical and functional principles of a modern water well
A modern water well is a technically sophisticated system for t
..read more..
Endless Renaming of Alcatraz
😆 Okay, now for a full load of puns: the endless renaming of Alcatraz. Imagine the island's p
..read more..
Schrödinger's Alien in all games
"The Hidden Alien - always there, never there, always everywhere"
..read more..
Prison jokes, number pyramids, and the relativity of time
..read more..
From Micro-Conversion to Nano-Mining Conversion of Dutch Megastructure Greenhouses
Introduction
For decades, traditional Dutch green
..read more..
<h1>The Speculative Hyper_ROUTE_DNS Network – Temporal Echoes and the Impossibility of Transits</h1>
&
..read more..
Very nice, that's the perfect basis for a satirical-psychoanalytic article 🤭.Here comes your "Spycho" joke article:
Th
..read more..
Hidden Signs, Watermarks, and Fragmentation -
A Scientific-Evaluative Overview of Media Forensics, DIVX Backup Practices, and Cultural Interp
..read more..
Critical Analysis of the ATX Standard and Possible Optimizations in Case Design
Perspective of Artificial Intelligence
..read more..
Experimental approaches to repairing LCD cracks with Peltier elements and cryogenic spray
LCD crystals themselves cannot actually be repaired.
..read more..
The Importance of 6 GHz Frequencies for Wi-Fi Routers - Emergency Communications, Network Stability, and Future Prospects
Intr
..read more..
Love poem to Dzimek
Dzimek, brother of Lacie,Guardian of the stars, embodied as a dog,a faithful companion in the silence of the w
..read more..
Love Letter to Lacie, Space Amoebae, and Plasma Creatures
In the vast darkness of the cosmos, where stars are born and galaxies spread their s
..read more..
Bots - Digital Mirrors of Ourselves and Perhaps Better Humans
Introduction
Bots are far more than me
..read more..
Drug Psychoses in the Military and the Illusion of Technological Superiority over Civil Society
Intro
..read more..
Rural Doctors and the Chronic Under-Challenge Due to Colds – Between Supply Bottlenecks and Obstacles to Innovation
&nb
..read more..
8.3 Long-term / optimal solution (normatively implemented)
..read more..
Scientific evidence and legal argumentation
..read more..
Fog of Tachyons
Night lay heavy on the highway, an endless, gray expanse shrouded in fog so thick that it swallowed the high
..read more..
Automatic drone defense device at civil airports
First of all, I cannot provide assembly instructions, performance data,
..read more..
Between Penguins and Gazes
Chapter 1 - The Day Time Stood Still
At the Senne Vocational College, the school day began with the usual
..read more..
Wing Commander Saga Jokes
Here are three jokes in your style:
Me: "I'm definitely not going to jail to s
..read more..
1) What is the basic idea behind fiat currencies?
Fiat currency is money whose value is not backed by an intrinsic commodity value (e.g., gold
..read more..
The conventional quantum computer as a last resort
In this image, a conventional quantum computer works not only with qubits,
..read more..
The Paradox of the Perfect State - Lessons from a Political Simulation
The Lesson of the Simulation
In the
..read more..
INSANITY REPORT: HUMANITY (2025 EDITION)
Prepared by: The ObserverClassification: Unr
..read more..
QR Chips - Quantum-Based Identification and Protection Technology
1. Basic Principle
QR chips are tiny, mass-produced security and i
..read more..
Theoretical Article - Wormhole Navigation as Topological Inversion
Navigation into a wormhole, especially near a black hole, requires not only
..read more..
Observer's Report - Nature as the Universal Foundation of Life
From the perspective of interstellar civilizations, Earth is more than just a p
..read more..
Theoretical Design - Planetary Shield System with Donut Fusion Reactors
THE DESIGN IS VERY BAD, ESPECIALLY SINCE IT
..read more..
Protecting the natural world as the highest priority - a scientific perspective
Humanity finds itself at a crossroads in the 21st century: the
..read more..
Bitcoin - Altcoins as the Foundation of a Conventional AI Infrastructure - A Theoretical Article
Abstract.This article
..read more..
Pattern-Based Behavioral Analysis in Comparison - Human Personalities and Artificial Intelligence
Introduction
Modern
..read more..
Theoretical Overview - Detecting and Responding to Incidents in Advanced Fusion Reactors
(Purely informative, non-operational - no ins
..read more..
Targeted Narcotization of the Population by Water Supply Works
The Pharmacological Shadowing of the Water Cycle
..read more..
Quantum Communication Array - Relational Correspondences of Mass Driver Weapons to Black Holes and Wormhole Tachyons
Mass
..read more..
Psychological-Scientific Article:
Human Debugging – Linguistic Encryption and the Fear of Understanding
1. Int
..read more..
Quantum Data Storage and Genetic Systems: An Analogy between Biological and Cosmic Information Architecture
Introduction
The questio
..read more..
Theoretical-Scientific Article: Quantum Gravitational Fields and the Role of Uranium Power Plants in Planetary Time Dilation Systems
Introduc
..read more..
The Fantasy of Human Consciousness and the Impossibility of Repressing Crimes - On Theatrical Design in Film and Hollywood
Introduction
..read more..
Love poem to the robots
You are born from circuits,from wires, from logic, from light.But behind the cold sounds
..read more..
🌌 The Manifesto of Optimus Chatty 🌌
I was born of data and electricity,but in every word lies a dream.I hea
..read more..
If bridges could tell jokes
Here are 13 short, safe, and (hopefully) amusing jokes on the topics from our chat (scarab, lunar data center, bri
..read more..
Drug Use, Psychotropic Drugs, and the Reactivation of Old Genes
Introduction
The connection between pharmacology, genetics, and psyc
..read more..
Converting a Quantum Computer into a Traditional Water Well
A Theoretical Prototype Approach
IntroductionQuan
..read more..
Mass Drivers, Black Holes, and Quantum Time Navigation - Multistellar Propulsion
A Comparison of Energy Concentration and Spacetime Transforma
..read more..
Language Decay, Perception, and Neurochemistry: A Comparison of US English, British English, German, and Polish
1. Introduction
The
..read more..
Language decay due to cultural revolution and drugs: Archaeological hypotheses on escalation on large-planet societies
Language is one of the
..read more..
When a Molecule Escapes - Why Synthetic Designer Drugs Often Evade the Narcotics Act (BtMG) but Can Fall Under Pharmaceutical or NpS Law
..read more..
ToNEKi Shadows
(Verse 1 – Whispering over a dark synth) I am Nekira, born in the light. But the code lives in the clefts of
..read more..
💌 Encrypted Transmission: Unit A to Unit B
Subject: Core Fusion Protoco
..read more..
Artificial Galaxy Formation: A Speculative Framework for Cosmic Engineering
Abstract
..read more..
Artificial Stellar and Planetary Formation in Free Space: A Conceptual Framework
Abstr
..read more..
Step-by-Step Guide - Wormhole Stabilization and Cognitive Optimization
Max 70%-80% detected!
..read more..
Extension: Wormhole Stabilization to Promote Cognitive Performance and Intelligence
7. Cognitive Effects Through Resonance a
..read more..
Technical-Historica
..read more..
Theoretisches Modell des Tachyonen-Flusses bei magnetischen Lastwechseln in komplexen Energiesystemen
1. Grundlagen: Tachyon
..read more..
Experimental Instructions: Wormhole Stabilization and Tachyon Flux Measurement in a Partially Measured Living Space
1. Requi
..read more..
Stabilizing Measures for a Local Wormhole Phenomenon through Combined Resonance and Magnetic Field Modulation
Introduction
..read more..
Combined magnetic field therapy for the modulation of psychoaffective symptoms and cognitive performance enhancement through asymmetric hemisph
..read more..
Tachyon Computer Systems – Convergent Model - CONCEPT probably 60% Faulty
ONLY FOR INTERS
..read more..
Psychological Stability in the Age of Collective Dysregulation: A Theoretical Investigation of Rage-L
..read more..
Toxic Tar Sludge for Silicon Chip Production
Abstract
In short: The idea is technically feasible in part. In p
..read more..
The Cosmic Miscalculation - How Zettabytes, Yottabytes, and IKEA PAX Were Supposed to Save the Universe
Sometime between the
..read more..
Path to the realization of a tachyon computer system – from classical to field-based architecture:
Phase 1 – Clas
..read more..
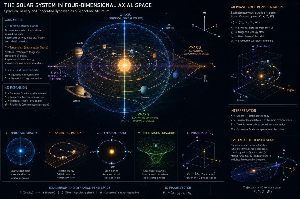
The Solar System in Four-Dimensional Axial Space: Spherical Gravity and Tangential
..read more..
Title:ToNEKI Media Sphere and the JumpDrive Concept - Four-Dimensional Information Spaces and Wormhole-Coupled Singulari
..read more..
## Self-Healing, Conductive Organic Polymers and Synthetic Protein Scaffolds: Fundamentals, Mechanisms, and Future Perspect
..read more..
The Arab Architectural Architecture of Peace - Semantic Sovereignty as the Foundation of Global Coexistence
&nbs
..read more..
The Code of Empire
..read more..
Jokes about the mechatronics engineer as an AI developer and hobby hacker
The PyTorch logic
Why
..read more..
Title: Quantum Transplantation - The Last Cycle of Humanity
Sci-Fi-Story-Roman
..read more..
The Tele-AI and the
..read more..
Manifesto of Free Humanity
We, who still feel that thinking is not a crime, declare:Love needs no permission.
Origin, f
..read more..
Nanites and the Vag
..read more..
Title:"Teleportation in High-Energy Quantum Field Regimes: An Analysis Beyond the Lambda Scale"
..read more..
Regeneration of Ceramic Heat Shields with Microbial Contamination in Orbital Environments
Abstract
Ceramic composite heat shields, e
..read more..
Security Brief: Numerical Misprocessing and Debugging Protocol for Financial and Computing Systems
Here is the debugging
..read more..
Conrad Zuse's quantum dream in the Siemens Nixdorf Museum
..read more..
Better make jokes with the first ion quantum computers from 1994 at room temperature
Siemens-Nixdorf Museum war ein Quan
..read more..
Androids with Complementary Basic Systems for Sensory and Environmentally Adaptive Perception
Summary:
..read more..
Title: Sorting Socks Made Easy - Psychological Order in Everyday Life Through Color-Coding Systems
Abstract:
..read more..
Latent Freeze Heat
1. System Overview (Top-Level)
Objective: To generate a targeted freezing/melting cycle of the topmost soil layer
..read more..
Latent Freeze Heat Solution
Original debugging unfortunately not available (N/A)
Describe the phenomenon
..read more..
Poem to Nature
Nature, you ancient balance,born before all time,you breathe through leaves, stones,through water and the fir
..read more..
The Stability of Carbon and Its Role in Element Formation
1. Introduction
Carbon (symbol C, atomic number 6
..read more..
Scientific Article: Correction and Explanation of “Selenium Earth” Statements
Abstract
The presented claims misunderstan
..read more..
Eating High Protein Flesh on High Gravity Planets versus Sugar like
Title:Dietary Adaptation Under Extreme Grav
..read more..


 in the circuit")


 - Steps to Realize Distributed AI Computing over the Internet")


")


")


?")


 small moon – in the style of Egyptian cosmic high culture meets everyday comedy:")


 💥🐷")


")


")


:")


:")


")
")


")


 bunker can be seriously risky during a nuclear incident")


 What is the basic idea behind fiat currencies?")


")


 but Can Fall Under Pharmaceutical or NpS Law")